On a recent twirl around the interwebz I came across a
picture tutorial for a braided bracelet that I thought was wonderful! I remembered that somewhere in my jewelry box I had the main ingredient for the project... and old curb linked bracelet.
Fast forward to later in the day. I'd chosen my material. I had my computer open to the picture, and was all set to go, but there was one little problem. I couldn't remember how to do a french braid! I struggled. I started over. I confess, I swore a couple of times, but I wasn't going to give up.
My friend Beckie came to my rescue!
When she came in I was just about to toss the project aside. I'd been taking pictures, and my starts were fine, it was just the braiding that had me stuck.
"Hey, Beckie! You have hair!" I declared.
She laughed at me, and agreed, she does indeed have hair. I asked her if she knew how to braid. My hair has been short for such a long time, I've forgotten.
With me holding onto the bracelet while she braided it, it began to take shape. Beckie's deft fingers made a project I'd struggled over for nearly an hour come together very quickly.
At one point I asked her, "So, how many redheads does it take to make a bracelet?"
We had a good chuckle, and I've been enjoying the results of our labors ever since.


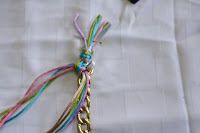

 Ingredients
::
- 1 Curb link bracelet
- Ribbon, or cording of your choice (I used satin cord in four colors)
- Two pieces of wire to act as needles
- Scissors
- Wire cutters
How to do it::
- Cut cording into eight equal lengths of 18" each. (better too much than not enough)
- Tie all pieces together in a single overhand knot.
- Separate colors into two groups.
- Place one section of strings under the first link then take it to the left.
- Bring second section over the top of the first section, then through the link from the bottom.
- Repeat with all links in the chain.
- Finish by adjusting all the threads, and chain to be smooth, and the first knot is firmly against the chain.
- Tie an overhand knot with all the threads on the last link.
- Trim ends to desired length.
- ... give the friend that helps you a big hug!
Thanks for the assistance Beckie! I think I might be able to make the next one by myself.